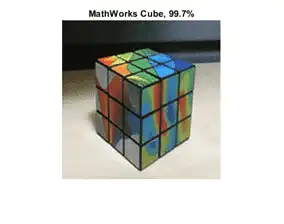
This example shows how to perform transfer learning interactively using the Deep Network Designer app.
Transfer learning is the process of taking a pretrained deep learning network and fine-tuning it to learn a new task. Using transfer learning is usually faster and easier than training a network from scratch. You can quickly transfer learned features to a new task using a smaller amount of data.
Use Deep Network Designer to perform transfer learning for image classification by following these steps:
-
Open the Deep Network Designer app and choose a pretrained network.
-
Import the new data set.
-
Replace the final layers with new layers adapted to the new data set.
-
Set learning rates so that learning is faster in the new layers than in the transferred layers.
-
Train the network using Deep Network Designer, or export the network for training at the command line.
Extract Data
In the workspace, extract the MathWorks Merch data set. This is a small data set containing 75 images of MathWorks merchandise, belonging to five different classes (cap, cube, playing cards, screwdriver, and torch).
unzip("MerchData.zip");
Select a Pretrained Network
To open Deep Network Designer, on the Apps tab, under Machine Learning and Deep Learning, click the app icon. Alternatively, you can open the app from the command line:
deepNetworkDesigner
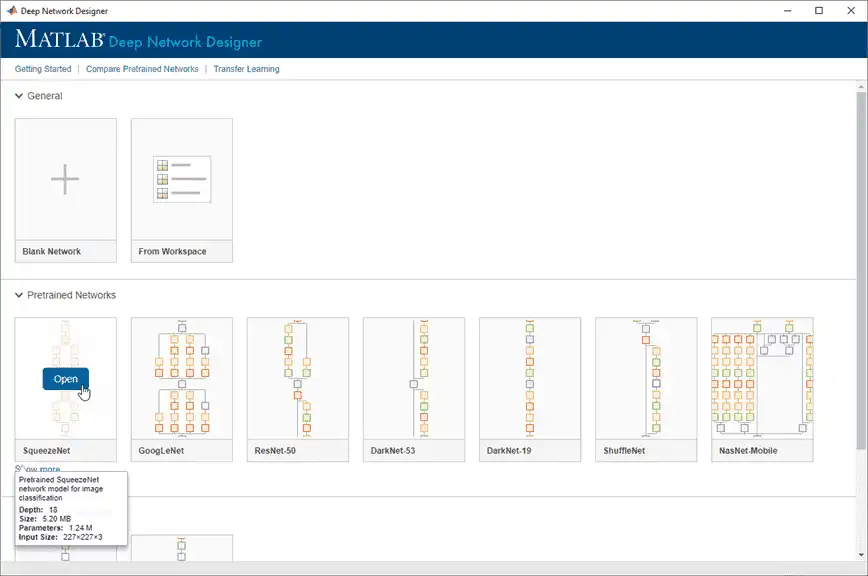
Deep Network Designer provides a selection of pretrained image classification networks that have learned rich feature representations suitable for a wide range of images. Transfer learning works best if your images are similar to the images originally used to train the network. If your training images are natural images like those in the ImageNet database, then any of the pretrained networks is suitable. For a list of available networks and how to compare them, see Pretrained Deep Neural Networks.
If your data is very different from the ImageNet data—for example, if you have tiny images, spectrograms, or nonimage data—training a new network might be better. For examples showing how to train a network from scratch, see Create Simple Sequence Classification Network Using Deep Network Designer and Create Simple Semantic Segmentation Network in Deep Network Designer.
SqueezeNet does not require an additional support package. For other pretrained networks, if you do not have the required support package installed, then the app provides the Install option.
Select SqueezeNet from the list of pretrained networks and click Open.
Explore Network
Deep Network Designer displays a zoomed-out view of the whole network in the Designer pane.
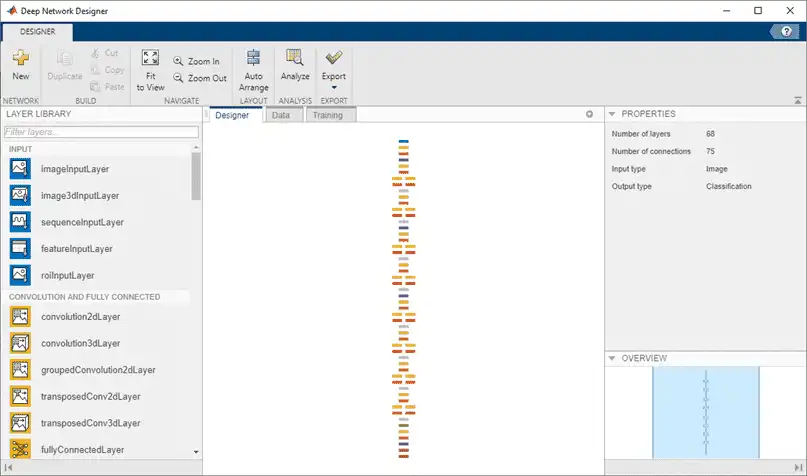
Explore the network plot. To zoom in with the mouse, use Ctrl+scroll wheel. To pan, use the arrow keys, or hold down the scroll wheel and drag the mouse. Select a layer to view its properties. Deselect all layers to view the network summary in the Properties pane.
Import Data
To load the data into Deep Network Designer, on the Data tab, click Import Data > Import Image Data. The Import Image Data dialog box opens.
In the Data source list, select Folder. Click Browse and select the extracted MerchData folder.
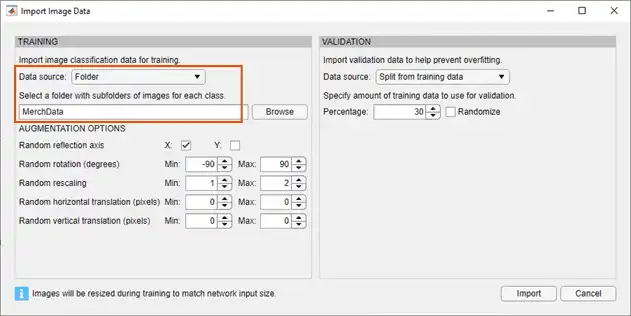
Image Augmentation
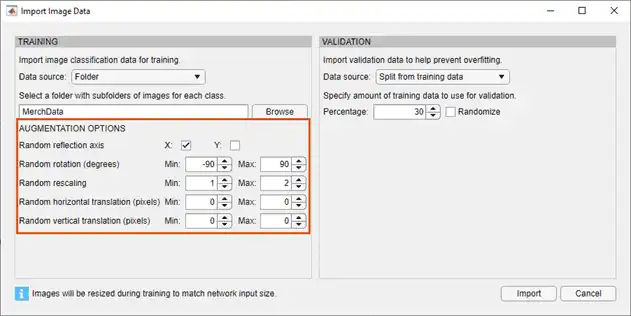
You can choose to apply image augmentation to your training data. The Deep Network Designer app provides the following augmentation options:
-
Random reflection in the x-axis
-
Random reflection in the y-axis
-
Random rotation
-
Random rescaling
-
Random horizontal translation
-
Random vertical translation
You can effectively increase the amount of training data by applying randomized augmentation to your data. Augmentation also enables you to train networks to be invariant to distortions in image data. For example, you can add randomized rotations to input images so that a network is invariant to the presence of rotation in input images.
For this example, apply a random reflection in the x-axis, a random rotation from the range [-90,90] degrees, and a random rescaling from the range [1,2].
Validation Data
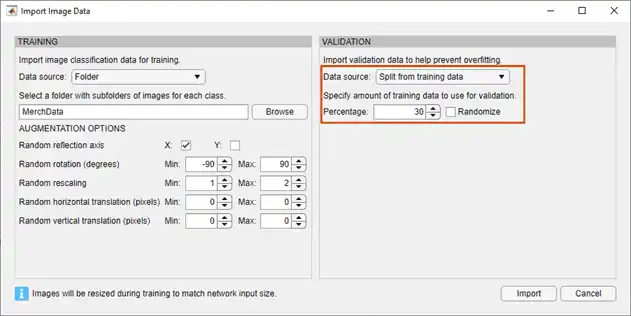
You can also choose to import validation data either by splitting it from the training data, or by importing it from another source. Validation estimates model performance on new data compared to the training data, and helps you to monitor performance and protect against overfitting.
For this example, use 30% of the images for validation.
Click Import to import the data into Deep Network Designer.
Visualize Data
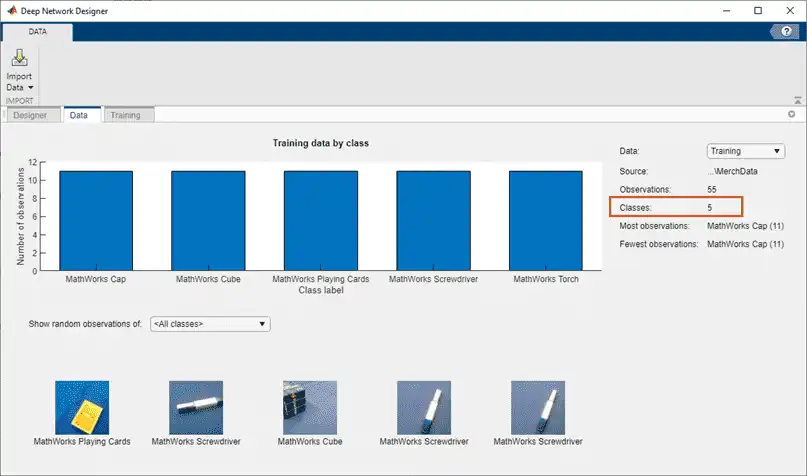
Using Deep Network Designer, you can visually inspect the distribution of the training and validation data in the Data pane. You can see that, in this example, there are five classes in the data set. You can also see random observations from each class.
Prepare Network for Training
Edit the network in the Designer pane to specify a new number of classes in your data. To prepare the network for transfer learning, replace the last learnable layer and the final classification layer.
Replace Last Learnable Layer
To use a pretrained network for transfer learning, you must change the number of classes to match your new data set. First, find the last learnable layer in the network. For SqueezeNet, the last learnable layer is the last convolutional layer, 'conv10'. In this case, replace the convolutional layer with a new convolutional layer with the number of filters equal to the number of classes.
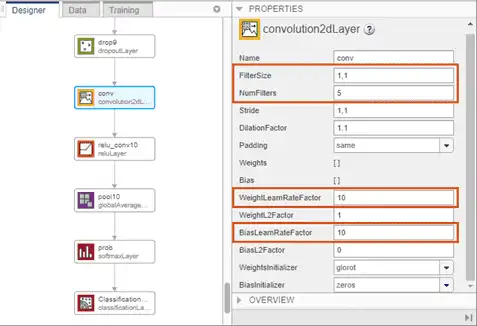
Drag a new convolution2dLayer onto the canvas. To match the original convolutional layer, set FilterSize to 1,1.
The NumFilters property defines the number of classes for classification problems. Change NumFilters to the number of classes in the new data, in this example, 5.
Change the learning rates so that learning is faster in the new layer than in the transferred layers by setting WeightLearnRateFactor and BiasLearnRateFactor to 10.
Delete the last 2-D convolutional layer and connect your new layer instead.
Replace Output Layer
For transfer learning, you need to replace the output layer. Scroll to the end of the Layer Library and drag a new classificationLayer onto the canvas. Delete the original classification layer and connect your new layer in its place.
For a new output layer, you do not need to set the OutputSize. At training time, Deep Network Designer automatically sets the output classes of the layer from the data.
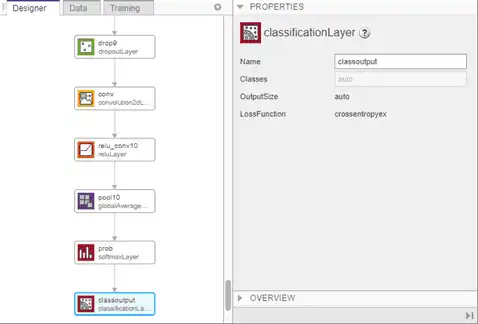
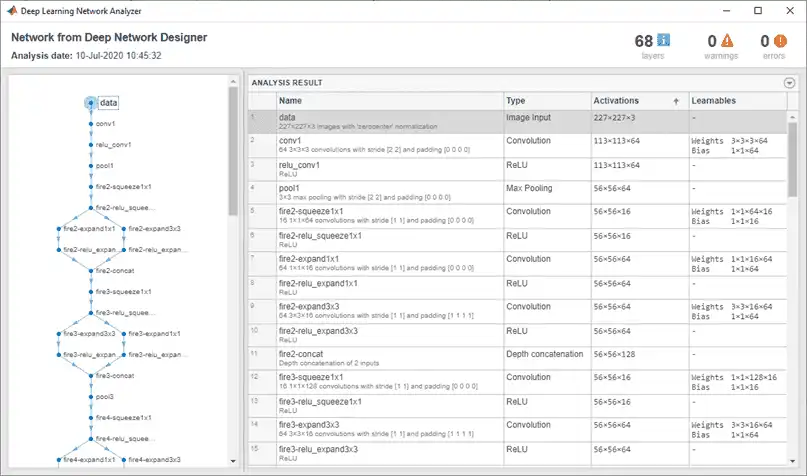
Check Network
To check that the network is ready for training, click Analyze. If the Deep Learning Network Analyzer reports zero errors, then the edited network is ready for training.
Train Network
In Deep Network Designer you can train networks imported or created in the app.
To train the network with the default settings, on the Training tab, click Train. The default training options are better suited for large data sets, for small data sets reduce the mini-batch size and the validation frequency.
If you want greater control over the training, click Training Options and choose the settings to train with.
-
Set the initial learn rate to a small value to slow down learning in the transferred layers.
-
Specify validation frequency so that the accuracy on the validation data is calculated once every epoch.
-
Specify a small number of epochs. An epoch is a full training cycle on the entire training data set. For transfer learning, you do not need to train for as many epochs.
-
Specify the mini-batch size, that is, how many images to use in each iteration. To ensure the whole data set is used during each epoch, set the mini-batch size to evenly divide the number of training samples.
For this example, set InitialLearnRate to 0.0001, ValidationFrequency to 5, and MaxEpochs to 8. As there are 55 observations, set MiniBatchSize to 11 to divide the training data evenly and ensure you use the whole training data set during each epoch. For more information on selecting training options, see trainingOptions.
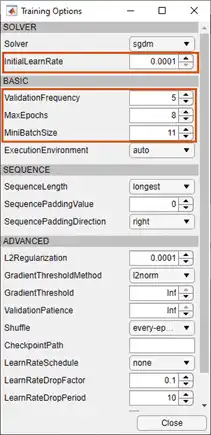
To train the network with the specified training options, click Close and then click Train.
Deep Network Designer allows you to visualize and monitor training progress. You can then edit the training options and retrain the network, if required.
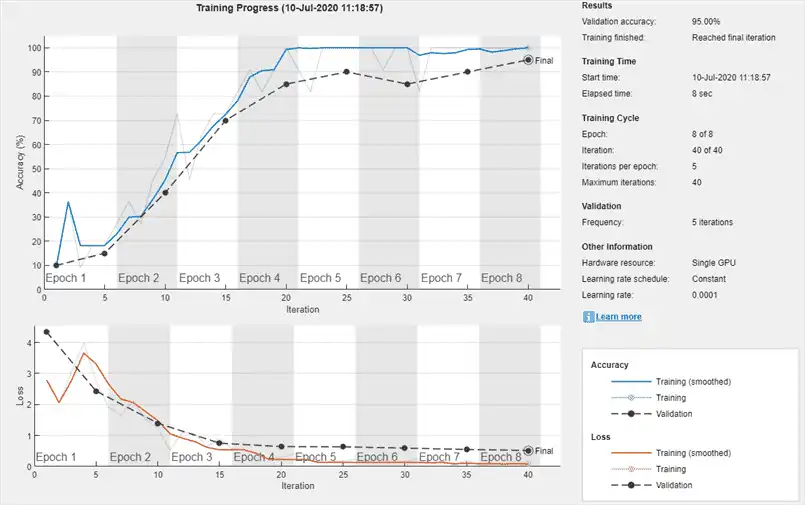
Export Results and Generate MATLAB Code
To export the network architecture with the trained weights, on the Training tab, select Export > Export Trained Network and Results. Deep Network Designer exports the trained network as the variable trainedNetwork_1 and the training info as the variable trainInfoStruct_1.
trainInfoStruct_1
trainInfoStruct_1 = struct with fields:
               TrainingLoss: [1×40 double]
           TrainingAccuracy: [1×40 double]
             ValidationLoss: [4.3374 NaN NaN NaN 2.4329 NaN NaN NaN NaN 1.3966 NaN NaN NaN NaN 0.7526 NaN NaN NaN NaN 0.6424 NaN NaN NaN NaN 0.6349 NaN NaN NaN NaN 0.5940 NaN NaN NaN NaN 0.5490 NaN NaN NaN NaN 0.5179]
         ValidationAccuracy: [10 NaN NaN NaN 15 NaN NaN NaN NaN 40 NaN NaN NaN NaN 70 NaN NaN NaN NaN 85 NaN NaN NaN NaN 90 NaN NaN NaN NaN 85 NaN NaN NaN NaN 90 NaN NaN NaN NaN 95]
              BaseLearnRate: [1×40 double]
        FinalValidationLoss: 0.5179
    FinalValidationAccuracy: 95
You can also generate MATLAB code, which recreates the network and the training options used. On the Training tab, select Export > Generate Code for Training. Examine the MATLAB code to learn how to programmatically prepare the data for training, create the network architecture, and train the network.
Classify New Image
Load a new image to classify using the trained network.
I = imread("MerchDataTest.webp");
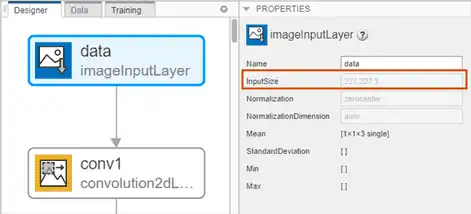
Deep Network Designer resizes the images during training to match the network input size. To view the network input size, go to the Designer pane and select the imageInputLayer (first layer). This network has an input size of 227-by-227.
Resize the test image to match the network input size.
I = imresize(I, [227 227]);
Classify the test image using the trained network.
[YPred,probs] = classify(trainedNetwork_1,I);
imshow(I)
label = YPred;
title(string(label) + ", " + num2str(100*max(probs),3) + "%");
